Requirements#
Cloudflare Business plan ($200 or higher), PRO version can refer to this article: https://moeyy.cn/posts/d4fb87f4694a.html
Your website must use HTTPS
Getting Started (Operations on CloudFlare).#
Bot Fight Mode#
First, you need to log in to the Cloudflare control panel, select Domains -> Firewall -> Bot Fight Mode, and click Configure Super Bot Fight Mode.
You can follow the settings in the image below:

Managed Rules#
Then open Firewall -> Managed Rules, check all options, set the sensitivity to High, and the action to Challenge.
Website and SSL Certificate Configuration#
Here are some general rules.
It is recommended to set up an SSL certificate for your website and enable the HTTP/2 protocol:

And enable Force HTTPS, you can also restrict the Minimum TLS Version to 1.1 (currently, the minimum version supported by browsers is 1.2). Refer to the image below:

Page Rules#
You can refer to my settings:

Firewall Rules#
Block Rules:#
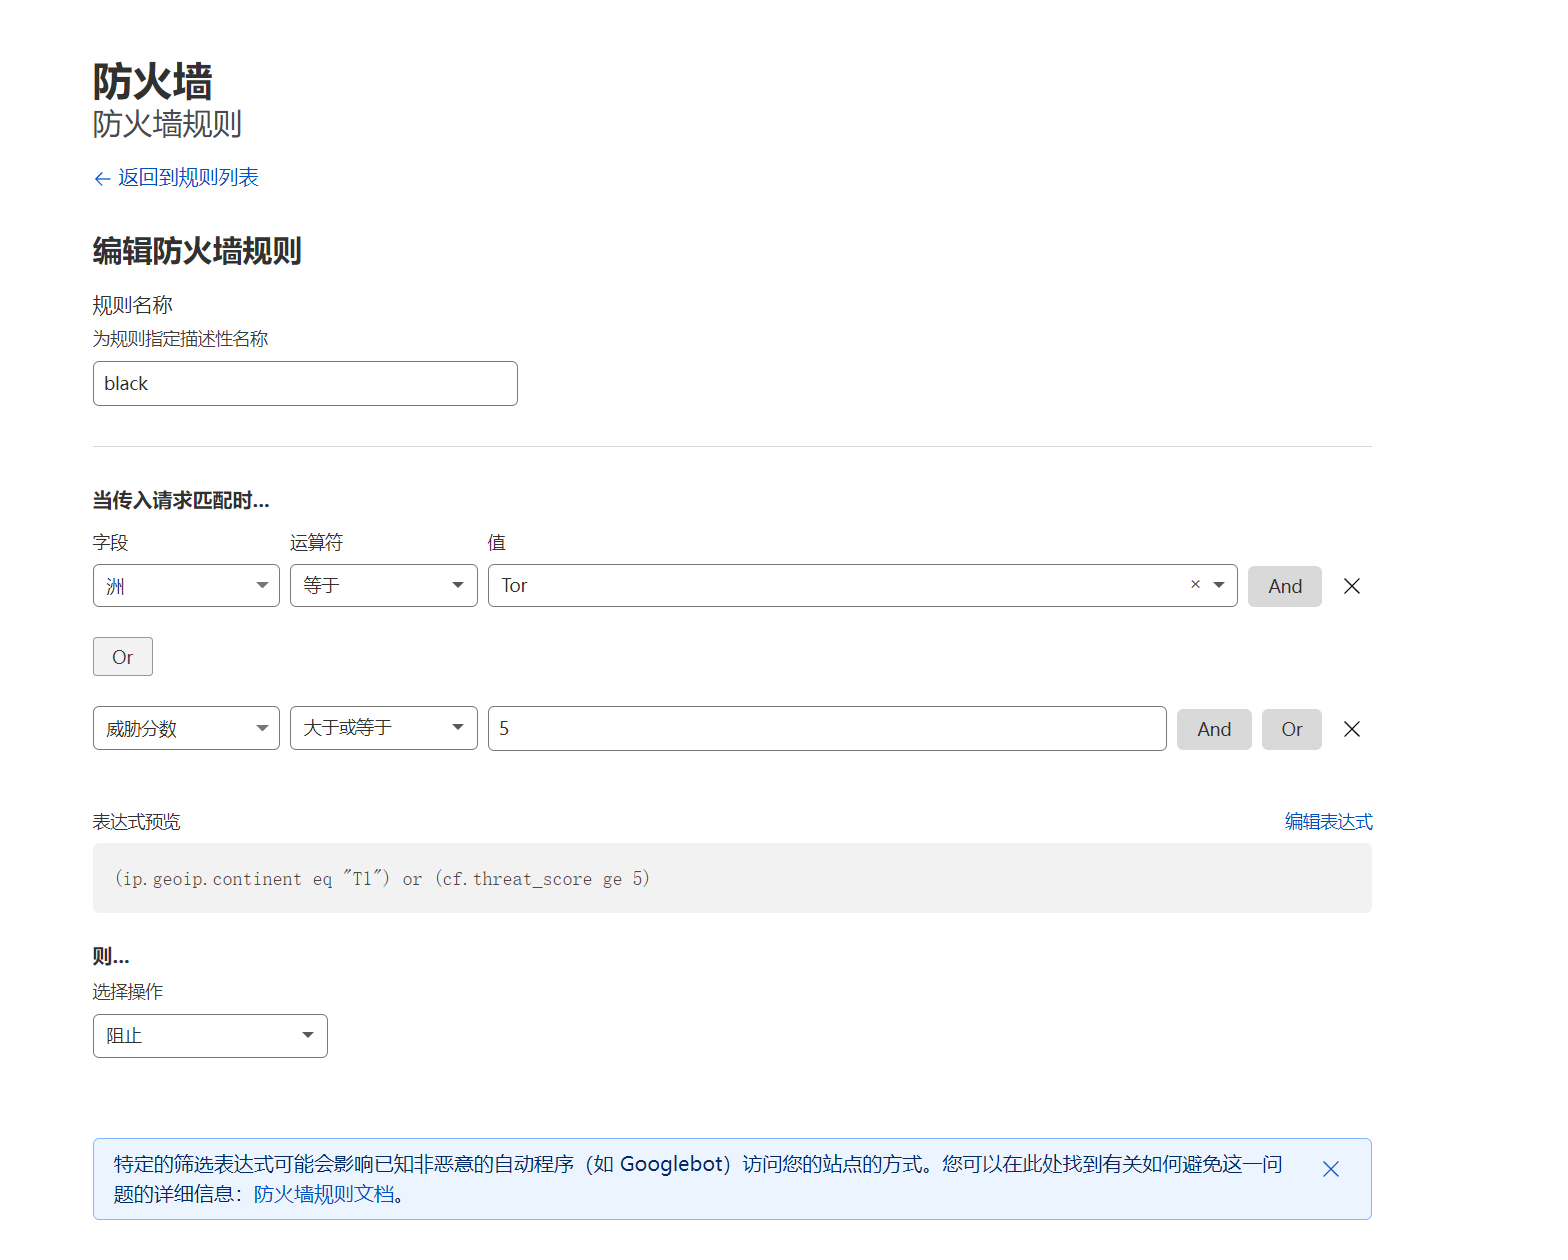
Tor is onion routing and can be blocked. Block requests with a threat score greater than or equal to 5. Normal visitors will not trigger the threat score, so don't worry about false positives.
Captcha Rules:#
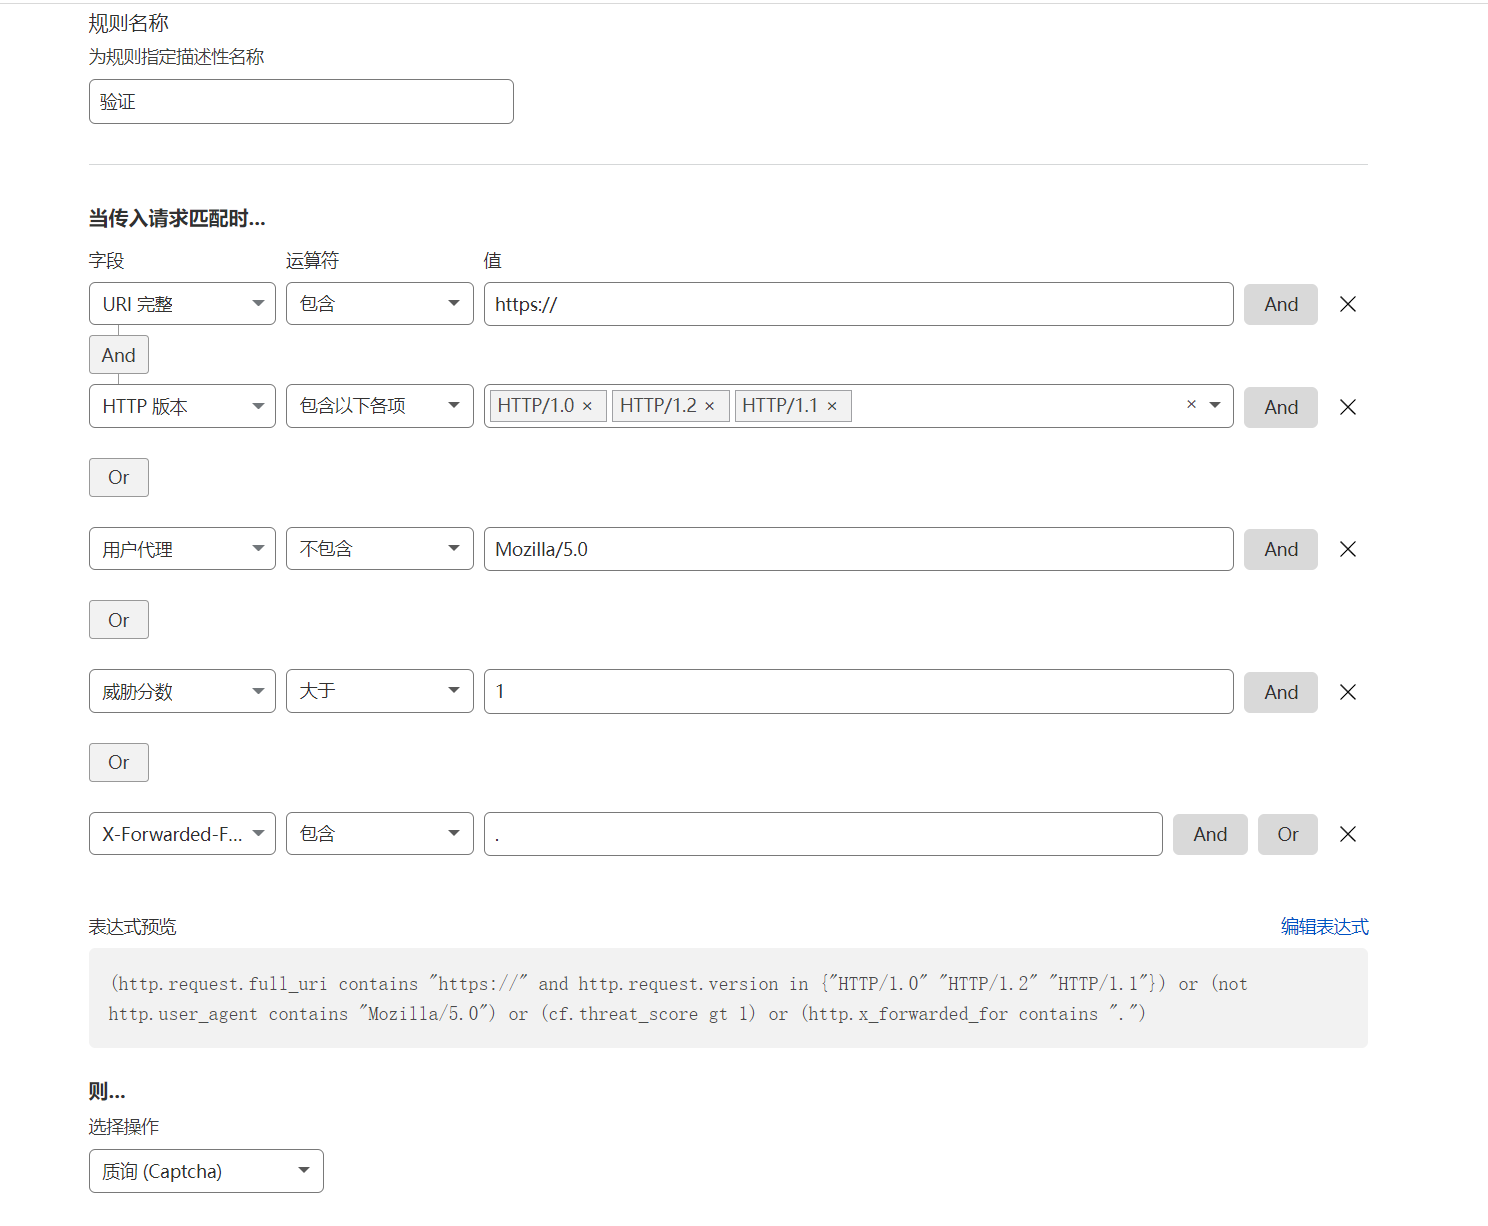
The first part means blocking HTTPS requests with HTTP version 1, because normal visitors accessing HTTPS will use HTTP/2, only proxy CC will use HTTP/1. This rule only works if your website has HTTPS enabled.
As for the user agent, it is used to prevent some strange user agents.
If the threat score is greater than 1, a captcha will be displayed. Normal browsers and clean IPs will not trigger it.
The last rule is to prevent IP spoofing.
In addition to setting rules, you also need to configure some other things.
For example, HTTP DDOS, set all values to the maximum:
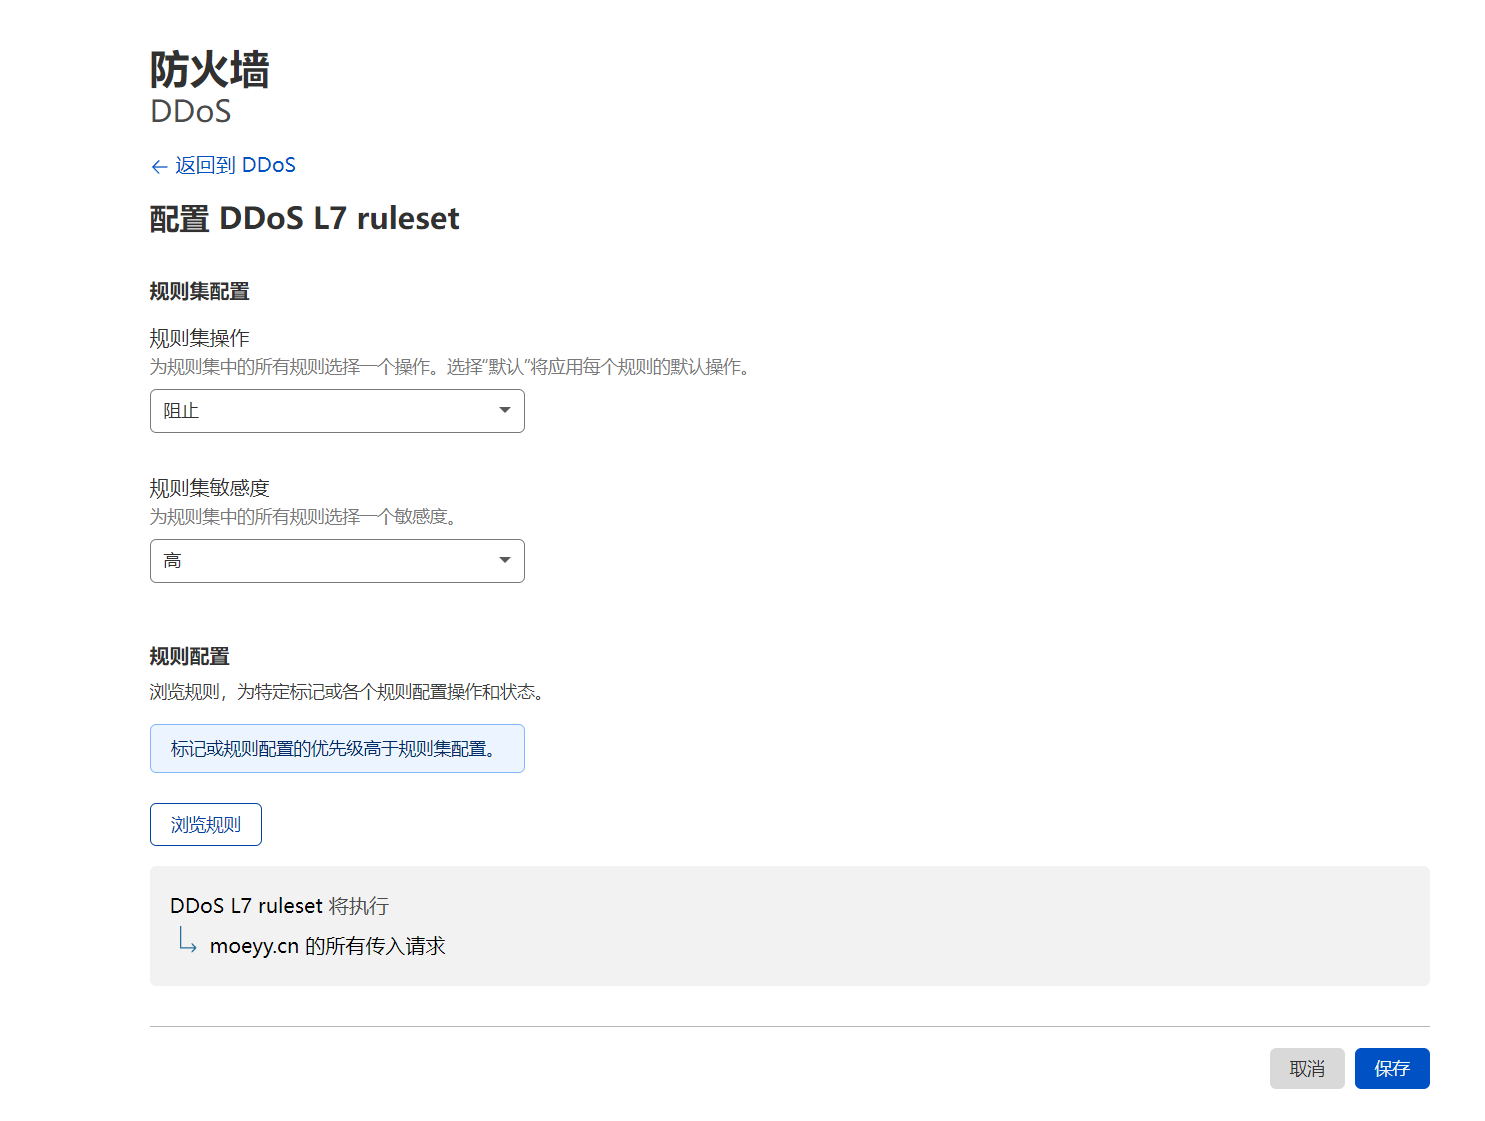
At this point, the rules set on Cloudflare are completed. Next is to configure the origin server.
Nginx Configuration#
We can set a separate user agent for the origin server and only allow that user agent to access the origin server.
First, perform the following steps on Cloudflare:

Create an HTTP header modification with the content User-Agent: XXX (XXX can be replaced with other values):

For example, mine is moeyydad, you can replace it with something else that is not easily guessed.
Then add an "if" statement in the nginx configuration file:
if ($http_user_agent != "moeyydad"){
      return 444;
}
This code should be added below the "root" directive:

Certificate Protection#
This can prevent the origin server certificate from being scanned. If the origin server uses SSL for origin, we need to upload a certificate. However, we cannot use our own certificate, so we can use a self-signed certificate. For example:
Certificate#
-----BEGIN CERTIFICATE-----
MIIDITCCAsagAwIBAgIUTcEWLzynkLCFCoAC1iDH2vG3EkYwCgYIKoZIzj0EAwIw
gY8xCzAJBgNVBAYTAlVTMRMwEQYDVQQIEwpDYWxpZm9ybmlhMRYwFAYDVQQHEw1T
YW4gRnJhbmNpc2NvMRkwFwYDVQQKExBDbG91ZEZsYXJlLCBJbmMuMTgwNgYDVQQL
Ey9DbG91ZEZsYXJlIE9yaWdpbiBTU0wgRUNDIENlcnRpZmljYXRlIEF1dGhvcml0
eTAeFw0xOTAxMTMxNDMxMDBaFw0zNDAxMDkxNDMxMDBaMGIxGTAXBgNVBAoTEENs
b3VkRmxhcmUsIEluYy4xHTAbBgNVBAsTFENsb3VkRmxhcmUgT3JpZ2luIENBMSYw
JAYDVQQDEx1DbG91ZEZsYXJlIE9yaWdpbiBDZXJ0aWZpY2F0ZTBZMBMGByqGSM49
AgEGCCqGSM49AwEHA0IABAg/hZ9lDHj/f+0jDRAN23TkNEqIi46mCGnwZVD3glxL
l+a1mpfXLHSEFTipnSyQgmvkPYzQGaEIFD0q6W/ZgMujggEqMIIBJjAOBgNVHQ8B
Af8EBAMCBaAwHQYDVR0lBBYwFAYIKwYBBQUHAwIGCCsGAQUFBwMBMAwGA1UdEwEB
/wQCMAAwHQYDVR0OBBYEFCEZF6Eyem01XPbgwr6DXLZV1qsQMB8GA1UdIwQYMBaA
FIUwXTsqcNTt1ZJnB/3rObQaDjinMEQGCCsGAQUFBwEBBDgwNjA0BggrBgEFBQcw
AYYoaHR0cDovL29jc3AuY2xvdWRmbGFyZS5jb20vb3JpZ2luX2VjY19jYTAjBgNV
HREEHDAaggwqLmRuc3BvZC5jb22CCmRuc3BvZC5jb20wPAYDVR0fBDUwMzAxoC+g
LYYraHR0cDovL2NybC5jbG91ZGZsYXJlLmNvbS9vcmlnaW5fZWNjX2NhLmNybDAK
BggqhkjOPQQDAgNJADBGAiEAnrequCk/QZOOrcPH6C3Hgcy4SPNUy5rQtku/aYkj
qQoCIQCN6IyYNiXuwG+8jUgJrveiirBjiz2jXZSTEfVAyibjTg==
-----END CERTIFICATE-----
Private Key#
-----BEGIN PRIVATE KEY-----
MIGHAgEAMBMGByqGSM49AgEGCCqGSM49AwEHBG0wawIBAQQgK0HE3hTJQDg6p/fj
nS92eSuRKZEZ5F4grT6tWFKNYVmhRANCAAQIP4WfZQx4/3/tIw0QDdt05DRKiIuO
pghp8GVQ94JcS5fmtZqX1yx0hBU4qZ0skIJr5D2M0BmhCBQ9Kulv2YDL
-----END PRIVATE KEY-----
How to test if your source IP is not leaked?
You can add your source IP and domain to the hosts file, then open a browser and access the website. If you cannot access it, it means the configuration is successful because it is restricted by the user agent.
Next, check the certificate to ensure it is not for your domain. Also, check the default certificate by accessing https://ip/. If the certificate is not for your domain, then you have succeeded.
Other Configurations#
Blocking Regions#
If your visitors are only from China, you can set it to allow only visitors from China:

Rate Limiting#

You can set rate limiting based on your website's API or other factors.
Custom Host Origin#

This is similar to custom UA origin. Currently, some scanning programs use a host header to access global IPs for testing and verification.
For example, you can set the origin domain to moeyydad.xyz and replace the source domain moeyy.cn with moeyydad.xyz. This way, the source server cannot be found. Combined with custom UA origin and the source server configured with CF's self-signed SSL certificate, the attacker will not be able to find the source server.
Generate the CF self-signed SSL certificate here:

After completing the above steps, your website will be invincible.